


The short version
You don't need to know art terms to make images in ChatGPT. Describe what you want to see, then ask for one change at a time until it looks right. Below are 12 example images, each with the complete prompt (the written request) that made it, ready to copy, plus a free list of 50 more style ideas.
A bookshop inside an open book. A camera suspended in separate layers. A coastline curved into a tiny planet. Each one starts with something you can describe in a few sentences.
You don't need to know the name of every art style to start making images in ChatGPT. You need a subject, a direction, and a way to explain what you want to change.
This guide gives you 12 visual ideas to try, each with a complete prompt you can copy. Pick an image that catches your eye, make it your own, and use its follow-up request to see how one small change affects the result. Jump to the 12 examples.
A note on how these were made: the example images were created with OpenAI's image-generation tool in Codex, OpenAI's coding assistant, not on the ChatGPT website. The prompts are written for ChatGPT, and your results will vary, even when you use the same words.
Make your first image in ChatGPT.
Start with one example and change as little as possible. You will learn more from comparing two versions than from writing a perfect first prompt.
Try this
- Open ChatGPT and start a new chat. You can simply ask for an image in the conversation, or select More, then Images.
- Choose one of the examples below. The miniature bookshop is a good first try because it doesn't need a photo of your own.
- Copy its full prompt and paste it into the message box. The first time, leave the wording alone, or change only the main subject.
- Send it. An image can take a few minutes to appear, and you can keep using ChatGPT while it's made. How many images you can create depends on your plan and, for work accounts, your company's settings.
- Look closely at the result. Pick one thing to change and send the follow-up request in the same conversation. Say what should stay the same as well as what should change.
- When you like it, open the image and select Save to download it. ChatGPT also keeps every image you create under Images. Keep a copy of the prompt with it so you can come back to the idea later.
Each of the 12 main examples can start in a fresh chat. The café sunrise edit later in the guide is different: it changes an existing image, so continue the conversation where you made the café, or attach the café image before you send the edit.
OpenAI keeps its current instructions in its Images in ChatGPT help article, including how to change just one part of an image with the selection tool.
Give the image a clear brief.
The free download in this guide lists 50 style names such as /cinematic, /diorama, and /tinyplanet. Treat them as labels for ideas. They aren't documented ChatGPT commands, and you don't need the slash for any prompt here.
The useful part is the description. “Cinematic” leaves a lot open. “Warm café windows reflected on wet pavement at blue hour” gives ChatGPT a scene to work with. (Blue hour is the deep-blue light just after sunset.)
Try this structure:
Create an image of [subject], in [style], at [setting]. Use [light and viewpoint]. Keep [important details]. Do not include [unwanted details].
You don't have to fill in every part. Include the details that matter to your idea. For more on giving AI useful direction, see how to give your AI a job for better results.
Nerd note What 21:9, 3:2, 2:3, and 1:1 mean in these prompts
They describe the shape of the image as width to height. 1:1 is a square. 3:2 is a classic landscape photo shape, and 2:3 is the same shape turned upright for posters and packaging. 21:9 is extra wide, like a movie screen. Naming the shape in the prompt helps keep the whole subject inside the frame you actually need.
Choose a look and make it yours.
Tap an image to see it larger, or tap its name to jump to its prompt. Each recipe below has the complete prompt, an idea for making it your own, and a follow-up to try in the same conversation. If you change the subject in a prompt, change it in the follow-up too.
Get all 50 image style ideas.
A three-page PDF with every style label from the list these examples came from, what each one means in plain English, a prompt formula, and a quick start. Twelve are demonstrated in this guide; the other 38 are starting points for your own experiments. Free, with no email address required.
Download all 50 image ideas · PDF, 111 KB Plain-text version · TXT, 6 KB
1. Make an ordinary place feel cinematic.
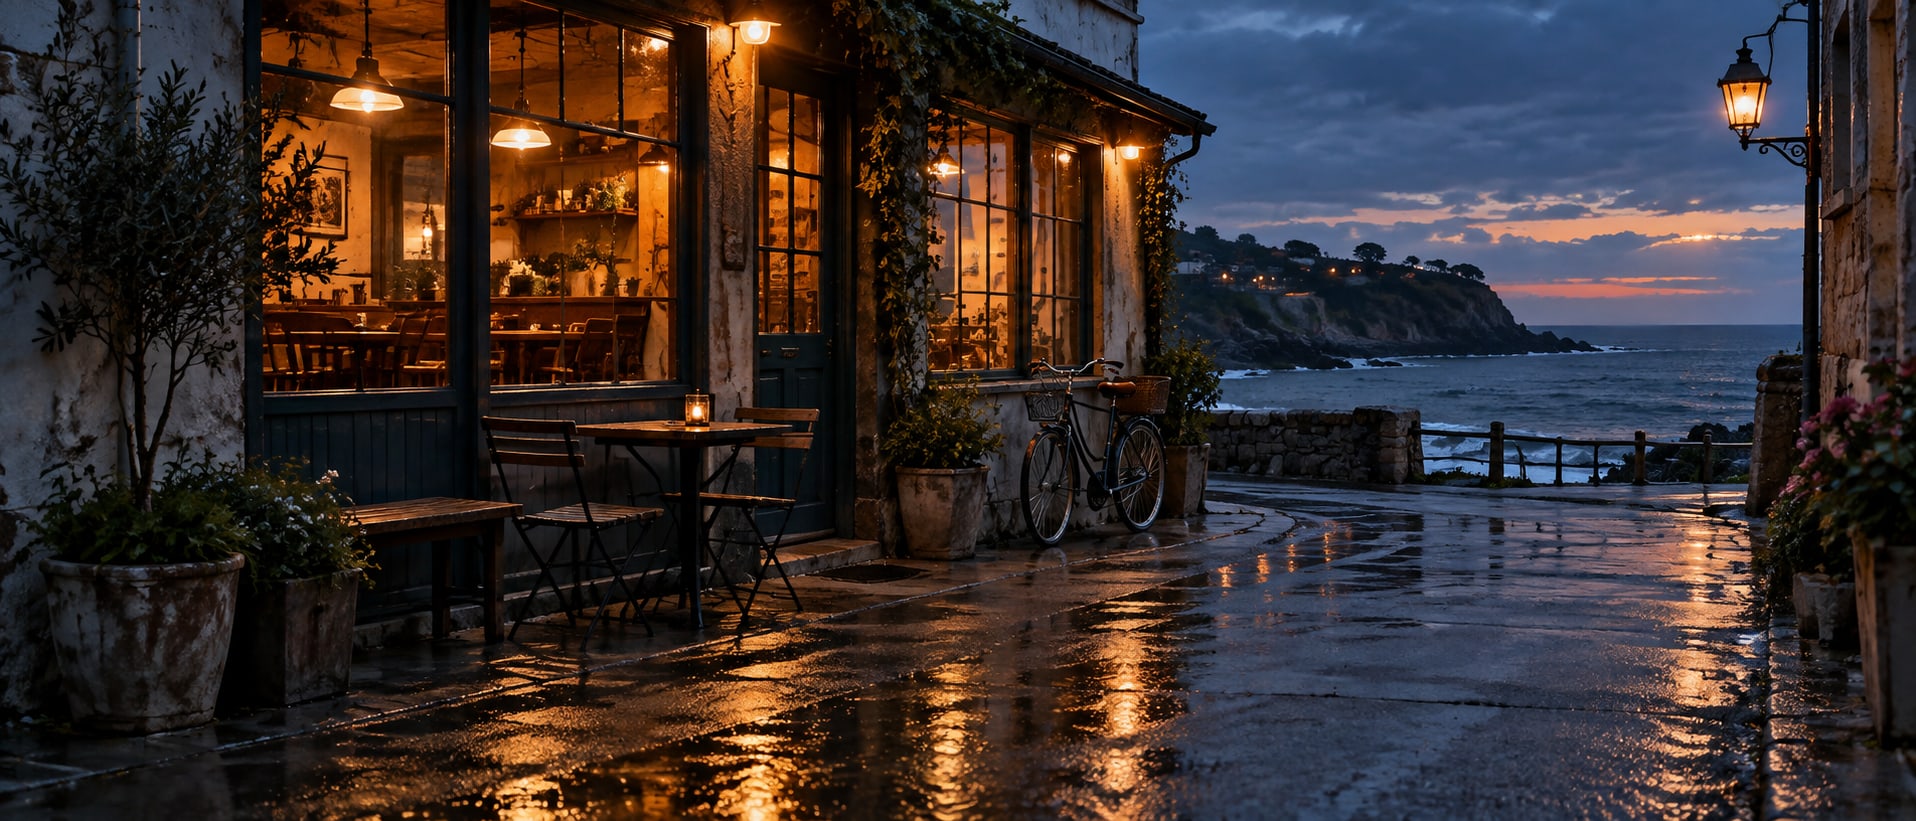
Prompt
Create a photorealistic cinematic image of a small coastal café just after rain at blue hour. Show warm amber light spilling from its windows onto wet pavement, with a bicycle outside and a glimpse of the ocean beyond. Use a low street-level viewpoint, realistic reflections, rich shadow detail, and subtle film grain. Make the scene quiet and believable, like a frame from an independent film. Use a wide 21:9 composition, with the café and bicycle comfortably inside the central area. No people, readable signs, logos, or text overlays.
Make it yours: Replace the café with a place you know, then choose a time of day.
Follow-up to try
Keep the café, bicycle, ocean, viewpoint, framing, and every object in the same position. Change only the time of day and lighting to a clear golden sunrise after the rain. Keep the pavement wet. Do not add or remove anything.
2. Build a miniature world inside a book.
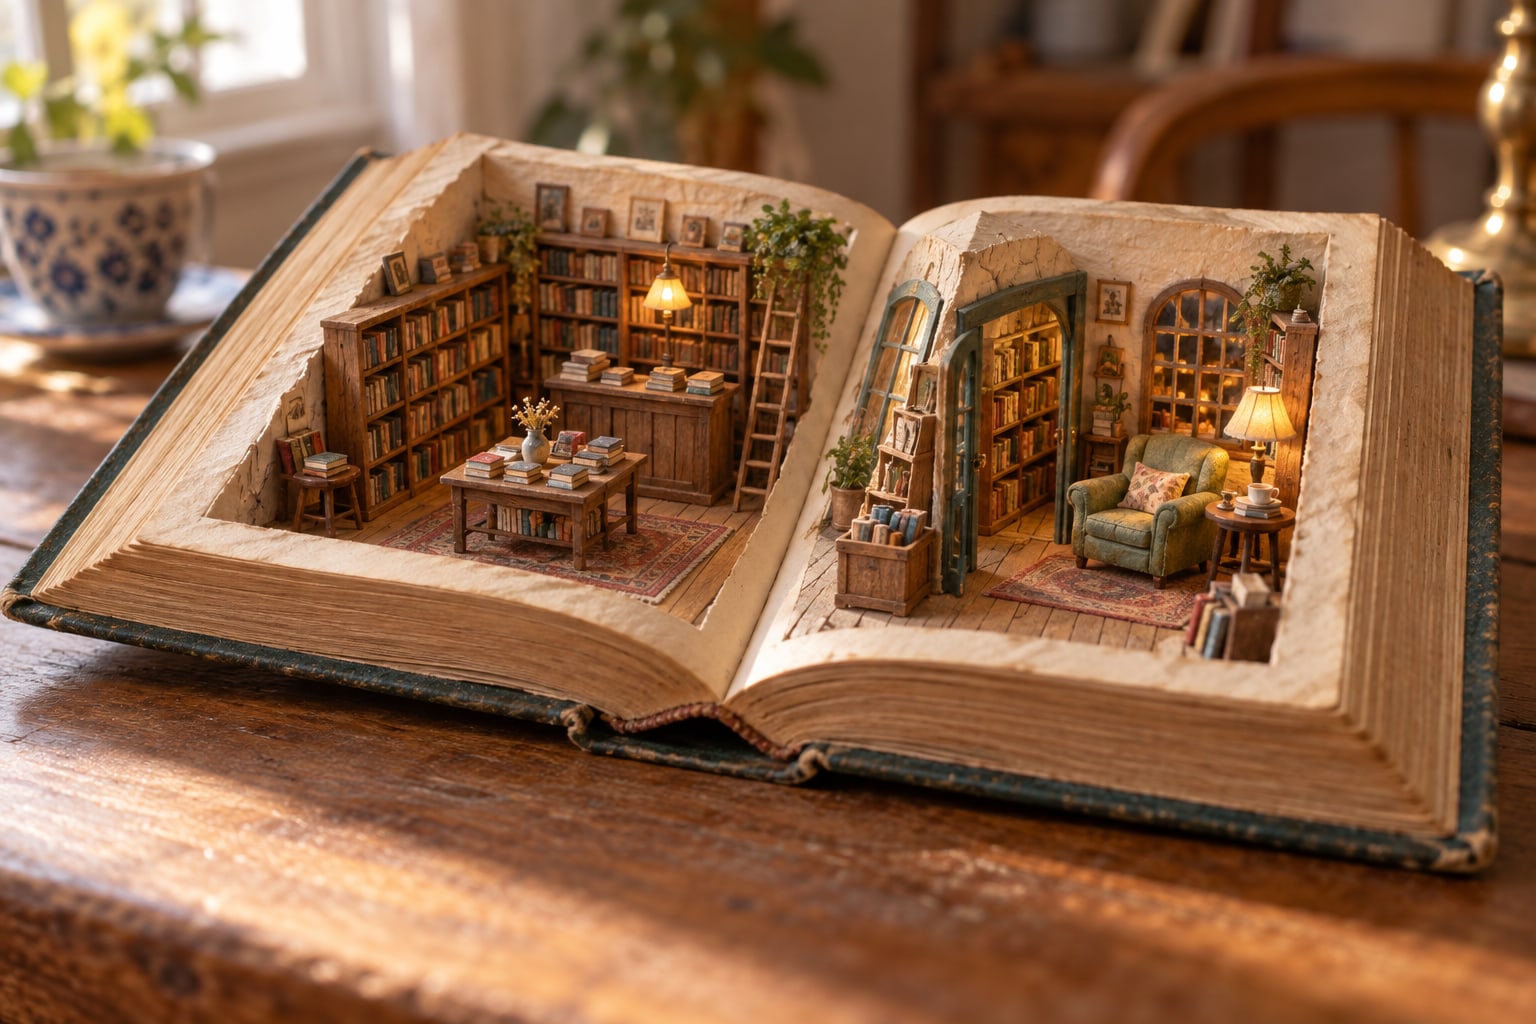
Prompt
Create an image of a tiny bookshop built inside the open pages of a large old hardback book on a wooden table. Treat it as a carefully handmade miniature: paper walls, shelves of tiny books, a little reading chair, and warm lamps. Photograph it from a low three-quarter angle with shallow depth of field, so the page edges reveal its small scale. Use tactile materials and soft afternoon window light. Make the entire open book visible in a landscape 3:2 composition. No people, readable words, logos, or text overlays.
Make it yours: Replace the bookshop with a bakery, greenhouse, or another small place.
Follow-up to try
Keep the miniature bookshop and camera angle unchanged. Turn the reading chair deep red and leave the other colors as they are.
3. Show an object as separate layers.
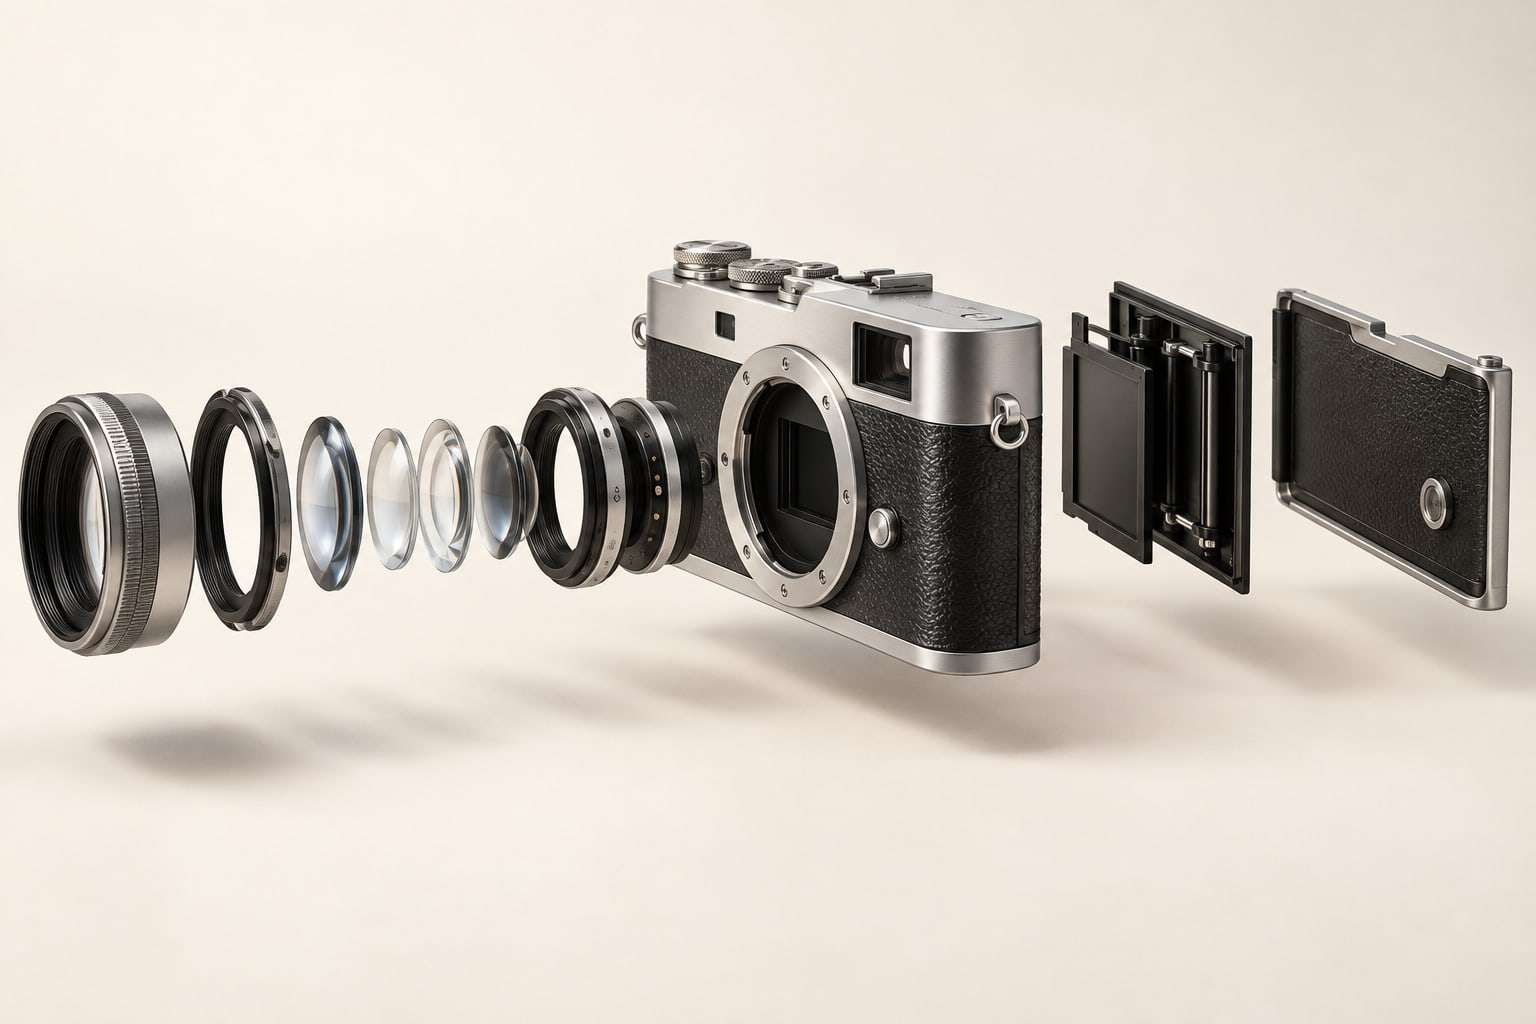
Prompt
Create a polished conceptual exploded-view illustration of a fictional retro camera with a silver metal body, black textured grip, and one circular lens. Show the outer body, lens rings, glass elements, and back panel floating apart in an orderly line along the lens axis. Keep generous, clear space between the parts and use a three-quarter viewpoint against a warm off-white studio background. Use realistic metal and glass materials with soft shadows. Landscape 3:2 composition. This is a visual design concept, not an accurate engineering or repair diagram. No labels, arrows, measurements, logos, or extra objects.
Make it yours: Try a simple familiar object such as a desk lamp or a coffee grinder.
Follow-up to try
Keep the composition and camera design. Increase the space between the components so their separate shapes are easier to see.
4. Draw a log cabin with dimensions and details.
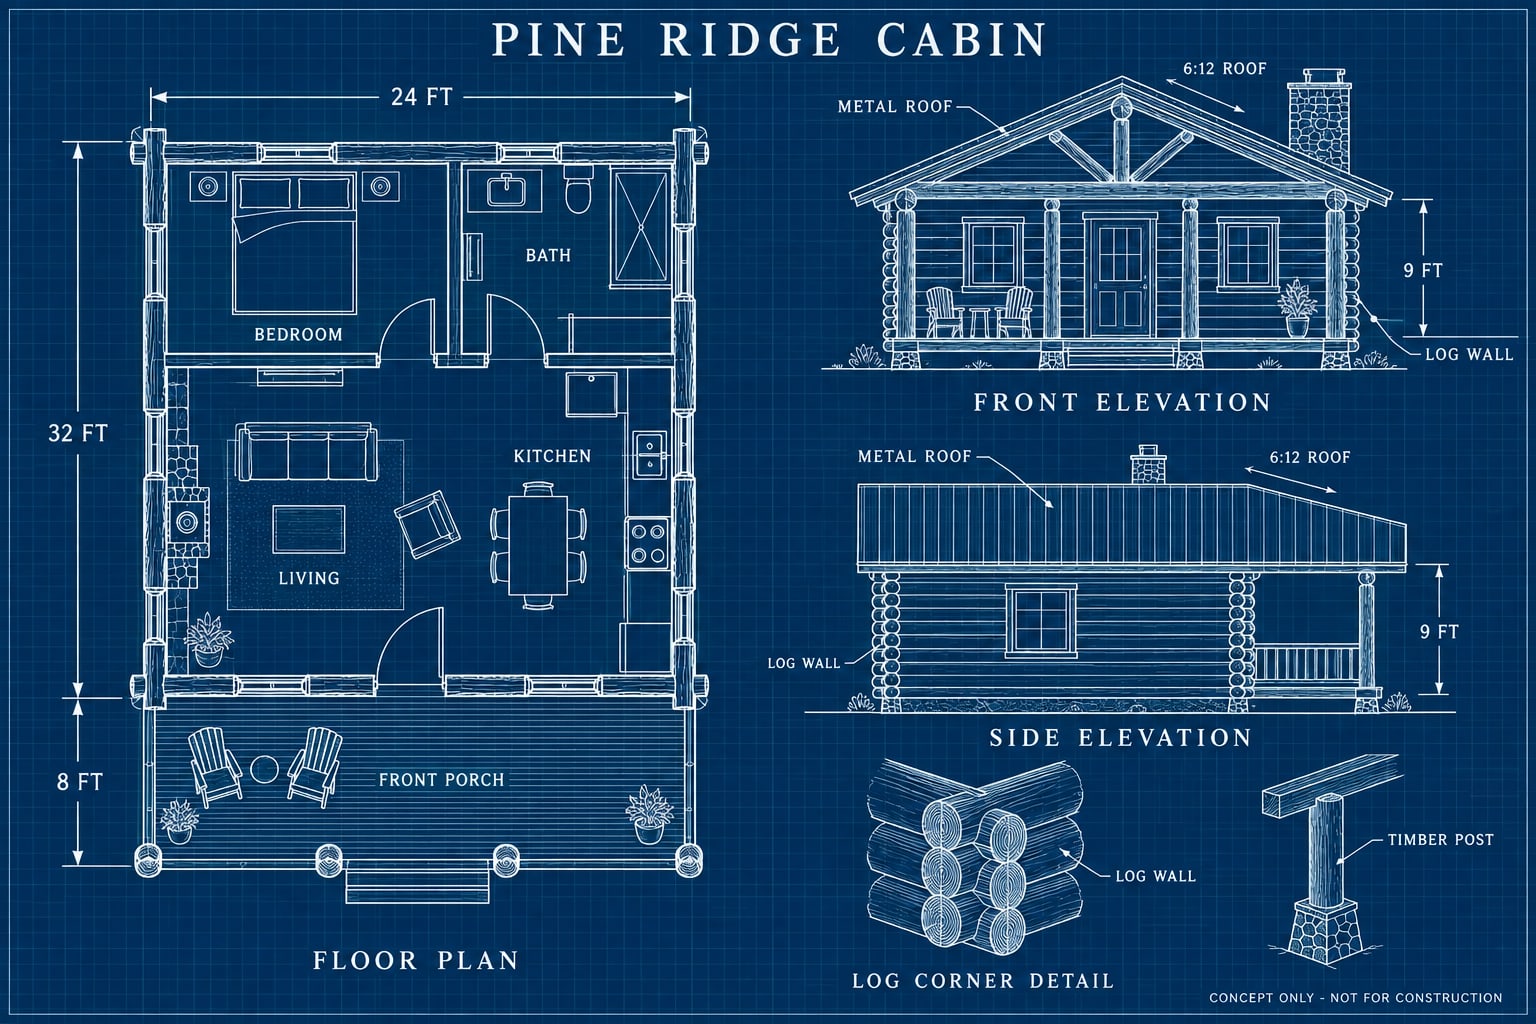
Prompt
Create a crisp, beautifully detailed architectural blueprint illustration of a small log cabin home, in landscape 3:2 format. Use precise thin white and pale-cyan drafting lines on a deep navy-blue background with a faint square drafting grid. The result should be a handsome illustrated concept sheet that readers can zoom into.

Title at top: "PINE RIDGE CABIN". Compose a large top-down FLOOR PLAN on the left, a FRONT ELEVATION at upper right, a SIDE ELEVATION below it, and a small LOG CORNER DETAIL at lower right. Clearly show horizontal round-log walls, interlocking log corner joinery, a pitched standing-seam roof, a front porch with timber posts, a front door, windows, door swings in the floor plan, simple kitchen cabinetry, one bedroom, a bathroom, and an open living area. Keep linework fine, disciplined, legible, and spatially organized with plenty of space between views.

Add readable architectural dimension lines with extension lines and arrowheads. The main cabin footprint is 24 feet wide by 32 feet deep; the full-width front porch extends an additional 8 feet from the front. Label these overall dimensions exactly "24 FT", "32 FT", and "8 FT" on their relevant plan edges. On the elevations, mark the wall height "9 FT" and label the roof slope "6:12 ROOF". Show these dimensions coherently across views. Use only these measurement values; do not invent extra dimensions or a drawn scale.

Use clear uppercase lettering for the view labels "FLOOR PLAN", "FRONT ELEVATION", "SIDE ELEVATION", and "LOG CORNER DETAIL". Label rooms simply "LIVING", "KITCHEN", "BEDROOM", and "BATH". Add short detail callouts "LOG WALL", "TIMBER POST", and "METAL ROOF", each pointing to the corresponding visible feature. Small, legible footer: "CONCEPT ONLY - NOT FOR CONSTRUCTION". No professional seals, approvals, logos, watermarks, decorative fake handwriting, camera components, photorealistic textures, or perspective distortions. This is an attractive AI-generated architectural concept illustration, not a verified building plan.
Make it yours: Try a garden studio or a tiny home. Name the views, rooms, and overall dimensions you want to see.
Follow-up to try
Keep the cabin, all views, labels, dimensions, and layout unchanged. Make the background grid subtler and the main wall outlines slightly brighter so the plan is easier to read.
5. Tell a small story in three panels.
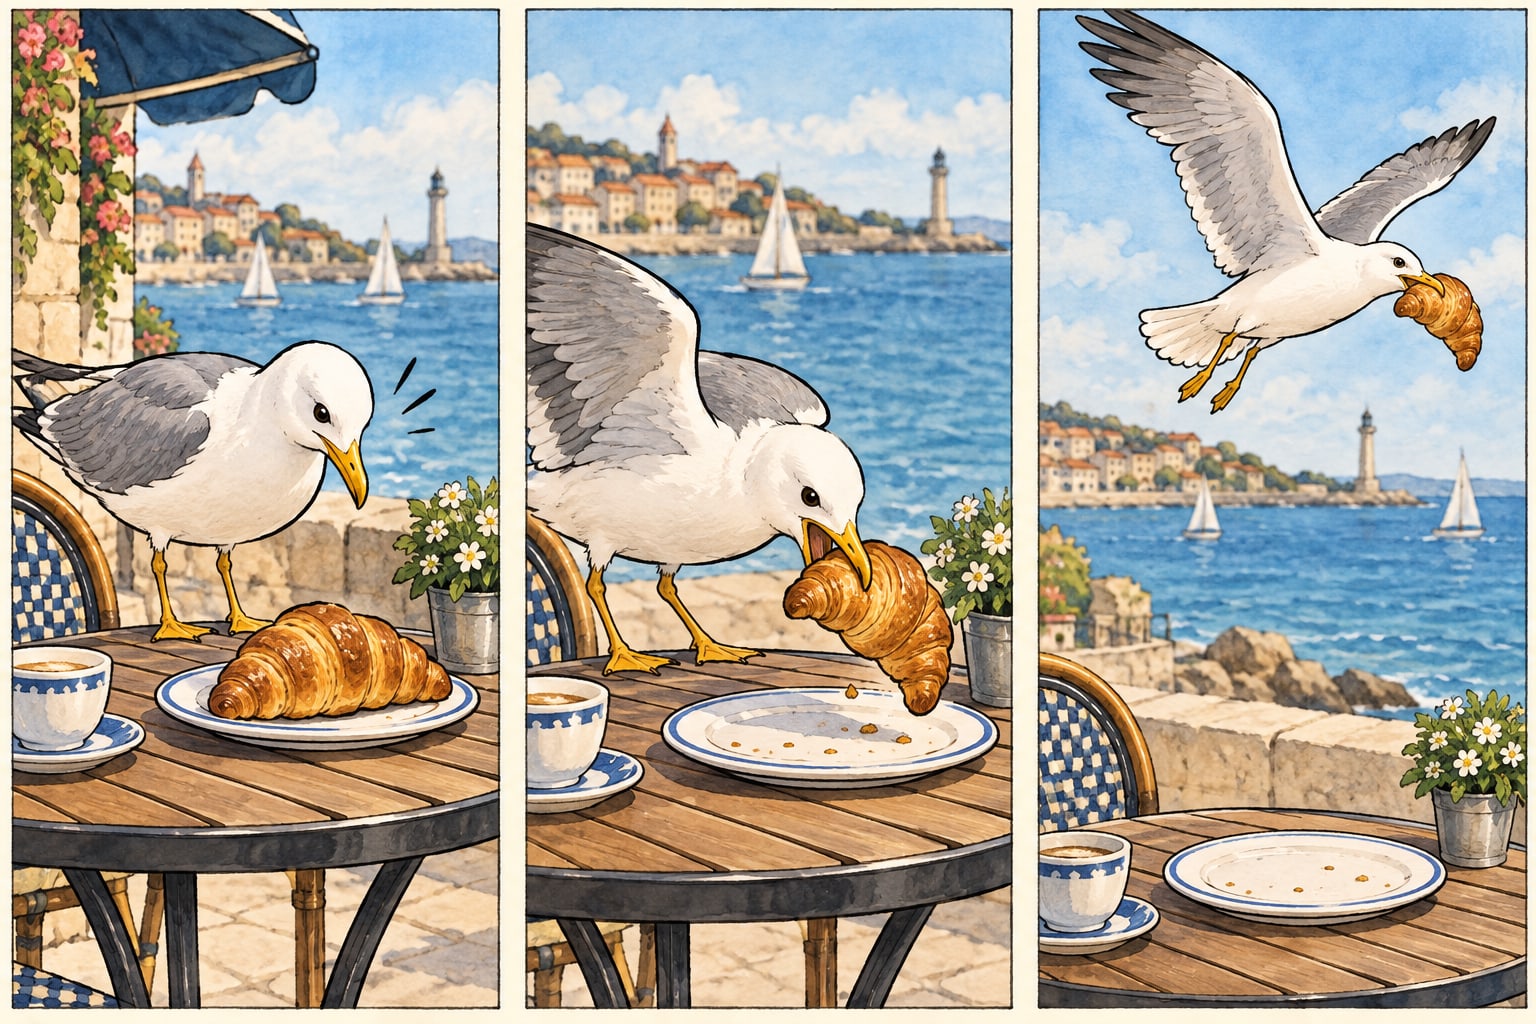
Prompt
Create a charming wordless comic in three equal panels arranged left to right, with clear cream gutters between them. Use expressive ink outlines, warm watercolor washes, and consistent characters. In panel one, a white seagull with gray wings and yellow feet notices a croissant on an outdoor café table. In panel two, the same gull grabs the croissant in its beak. In panel three, it flies away holding the croissant while the empty table sits below. Keep the action unmistakable and the coastal setting simple. Landscape 3:2 image. No words, speech bubbles, captions, logos, or extra panels.
Make it yours: Choose one character and describe three clear actions in order.
Follow-up to try
Keep all three panels and the story the same. Make the seagull's expression in the middle panel more mischievous.
6. Turn an imaginary character into a collectible.
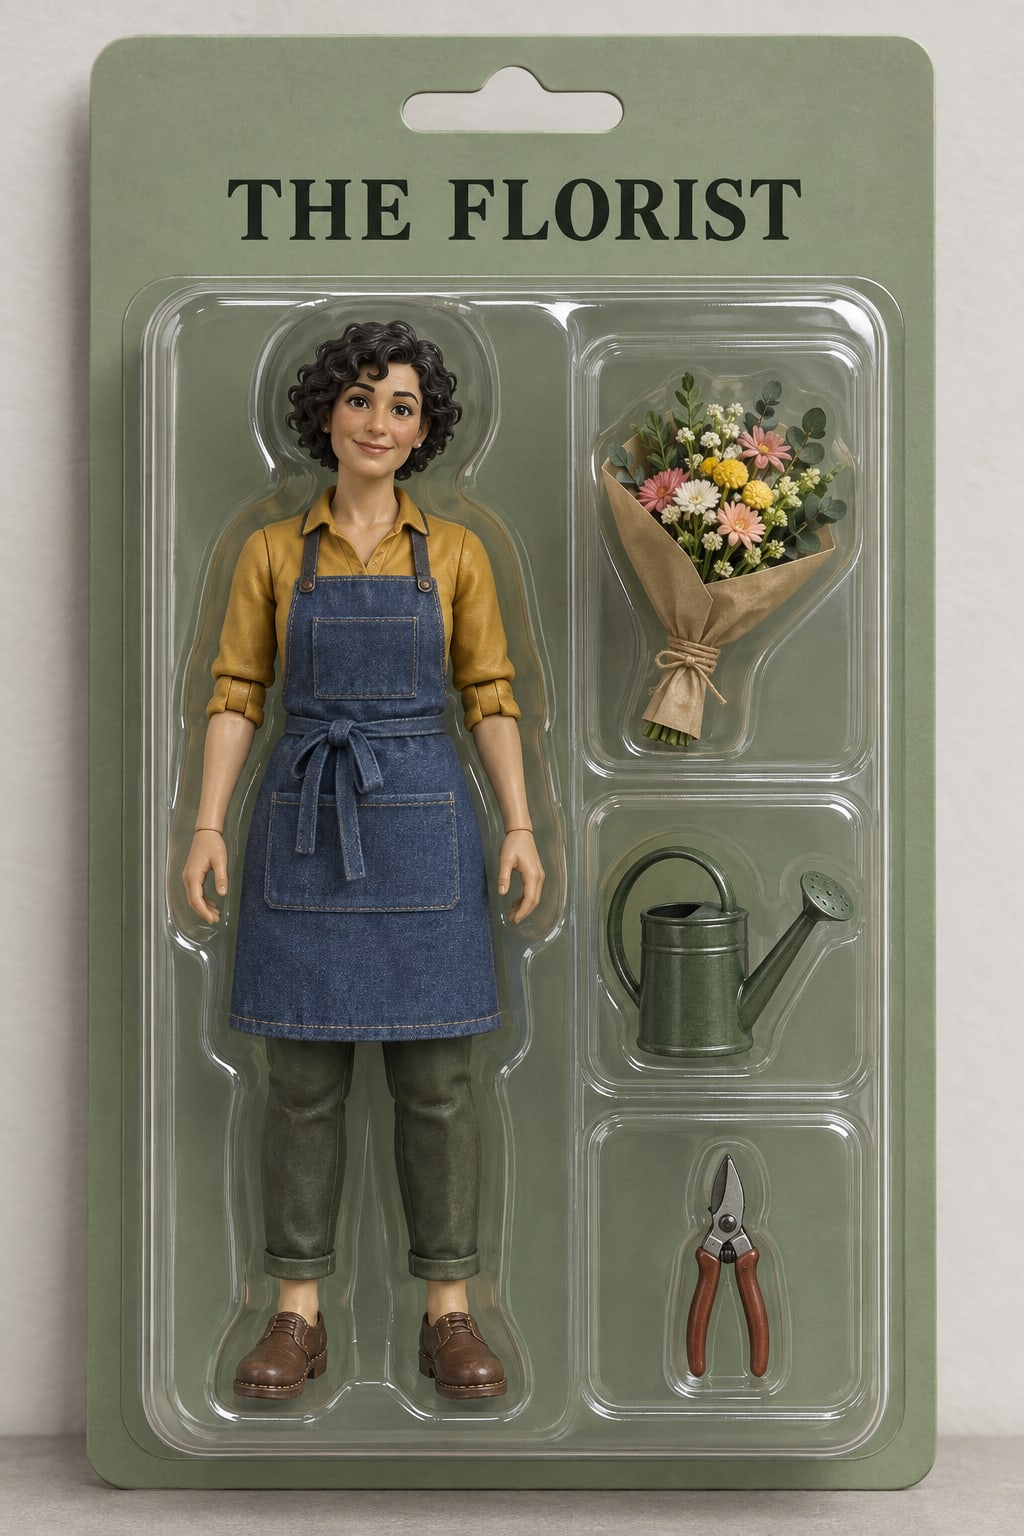
Prompt
Create a realistic studio product photograph of an original collectible florist action figure in a clear molded blister package on a sage-green cardboard backing. The figure is a friendly fictional adult with short curly dark hair, a mustard shirt, denim apron, and brown shoes. Include three miniature accessories in separate compartments: a flower bouquet, a watering can, and closed pruning shears. Show the whole package straight on, with believable plastic reflections and soft shadows. The only printed text is 'THE FLORIST' in clear dark uppercase letters at the top. Portrait 2:3 composition. No brands, prices, badges, additional writing, or real-person likeness.
Make it yours: Change the profession and give the character three relevant accessories.
Follow-up to try
Keep the figure, accessories, package shape, and title unchanged. Change only the cardboard backing from sage green to pale peach.
7. Give an original story a movie poster.
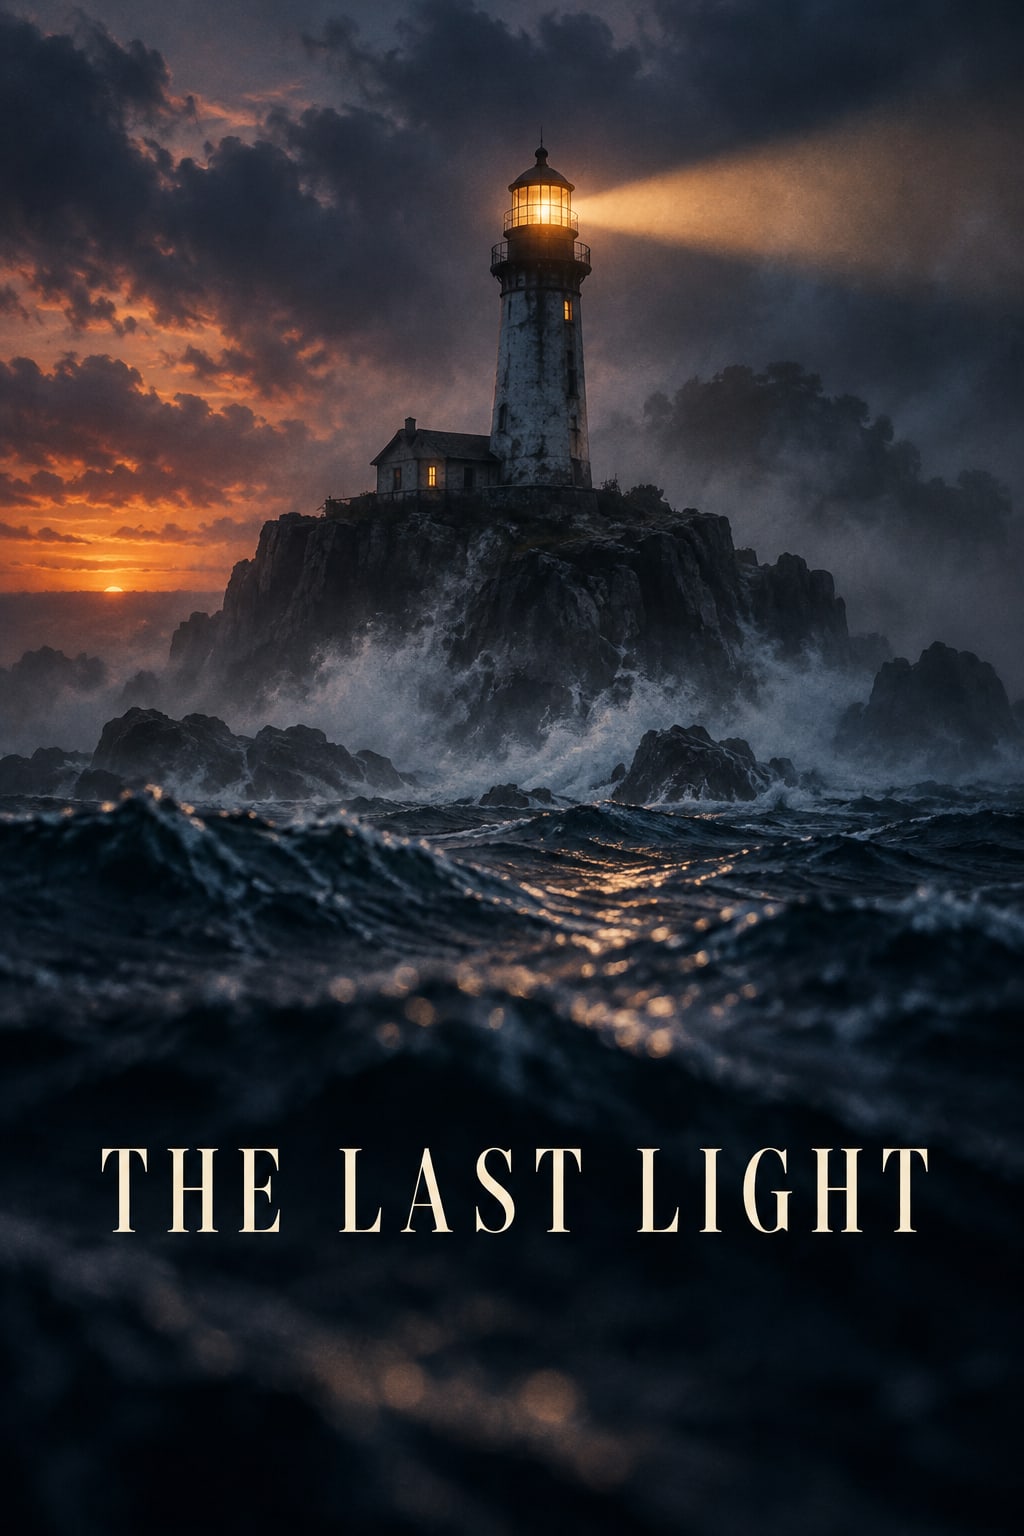
Prompt
Create an atmospheric poster for a fictional mystery film called 'THE LAST LIGHT'. Show a lone lighthouse on a rugged island at dusk, its amber beam cutting through dark ocean mist. Use a dramatic low viewpoint, deep indigo water, textured clouds, and restrained cinematic grain. Make the lighthouse the clear focal point. Place the exact title 'THE LAST LIGHT' in large, elegant, legible cream uppercase letters in the lower third. Portrait 2:3 composition. This is an original fictional film. No actor names, credits, taglines, existing movie references, logos, or other text.
Make it yours: Invent a short title and pick a setting that suggests the story.
Follow-up to try
Keep the lighthouse, framing, and title exactly the same. Make the mist thinner so more of the island is visible.
8. Make a new image feel like an old photograph.
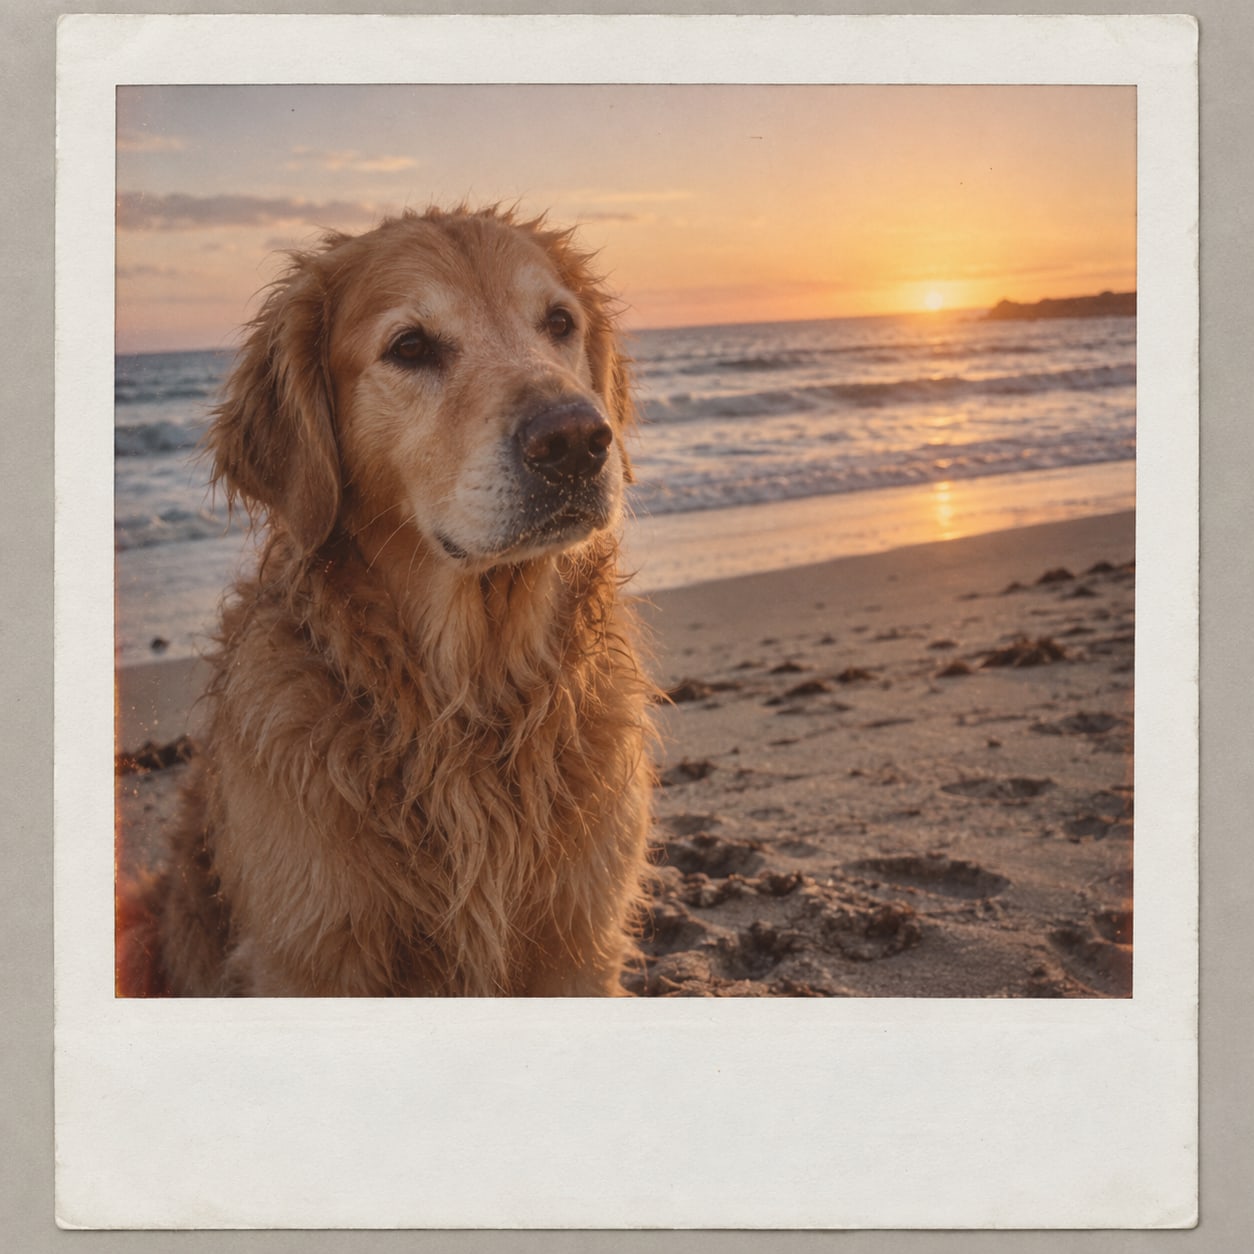
Prompt
Create a photorealistic instant-film-style photograph of a scruffy golden dog sitting on a quiet beach at sunset, looking just past the camera. Use warm faded colors, soft grain, slightly imperfect exposure, and casual off-center framing. Show real fur texture, a few sandy whiskers, and gentle ocean waves in the background. Present the photograph inside a simple off-white instant-photo border with a wider blank bottom margin, all against a neutral warm-gray background. Square 1:1 composition. No writing, logos, collars with readable tags, or extra animals.
Make it yours: Replace the dog with another subject and describe the mood you want.
Follow-up to try
Keep the dog, framing, and border unchanged. Make the colors a little cooler and the grain less noticeable.
9. Explain a simple process visually.
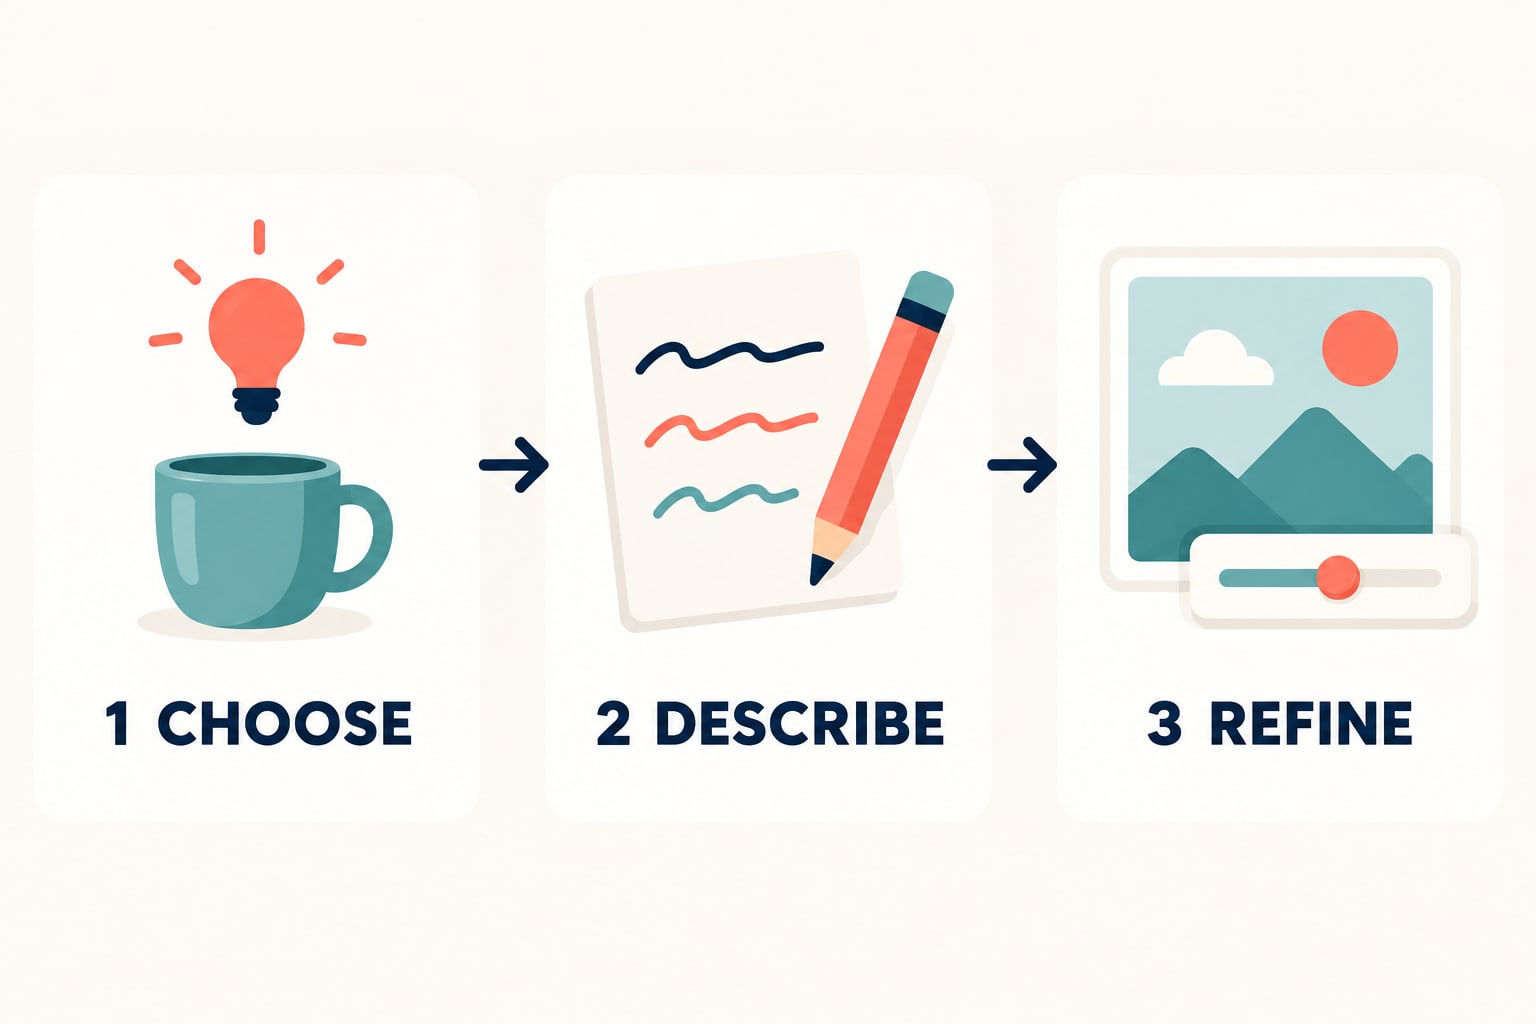
Prompt
Create a clean editorial infographic showing three steps for making an image. Arrange three spacious cards left to right on a warm ivory background. The first card shows a small idea spark above a simple object and the exact label '1 CHOOSE'. The second shows a pencil and a few abstract lines on paper with the exact label '2 DESCRIBE'. The third shows an image frame with a small adjustment slider and the exact label '3 REFINE'. Connect the cards with two simple arrows pointing right. Use bold dark-navy type, coral and teal accents, crisp friendly illustrations, and ample whitespace. Landscape 3:2 composition. Only those three labels may appear. No other words, logos, or decorative charts.
Make it yours: Use three steps you can explain accurately, with one short label per step.
Follow-up to try
Keep the labels, illustrations, and layout unchanged. Replace the coral accent color with warm yellow.
10. Wrap a coastline into a tiny planet.
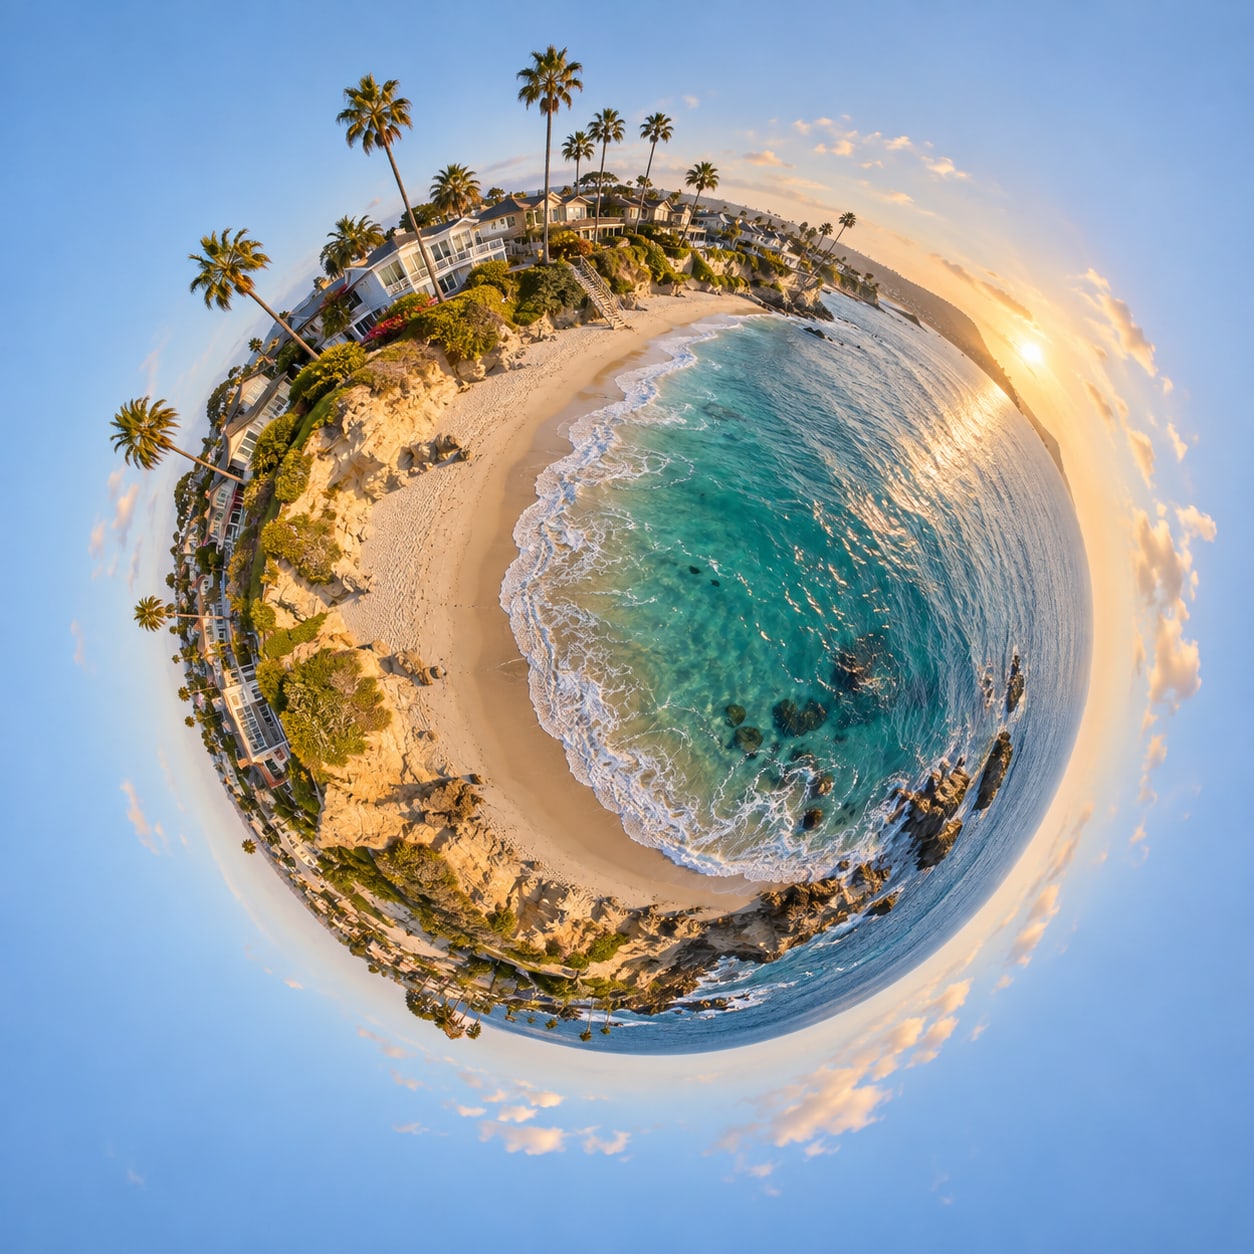
Prompt
Create a striking photorealistic tiny-planet panorama of an imaginary Southern California coastline. Wrap a curving sandy beach, turquoise ocean, coastal cottages, and a few palm trees around one small spherical world floating in a pale sky. Use the curved perspective of a stereographic panorama, with buildings and palms rising outward from the sphere. Keep the shoreline readable, the textures detailed, and the late-afternoon sunlight believable. Show the whole planet with generous space around it in a square 1:1 composition. No text, logos, satellites, duplicate planets, or recognizable landmark claims.
Make it yours: Try a mountain village, garden, or imaginary neighborhood.
Follow-up to try
Keep the planet shape, buildings, beach, and framing unchanged. Change only the lighting to a soft pink sunset.
11. Explore a hidden world in a butterfly wing.
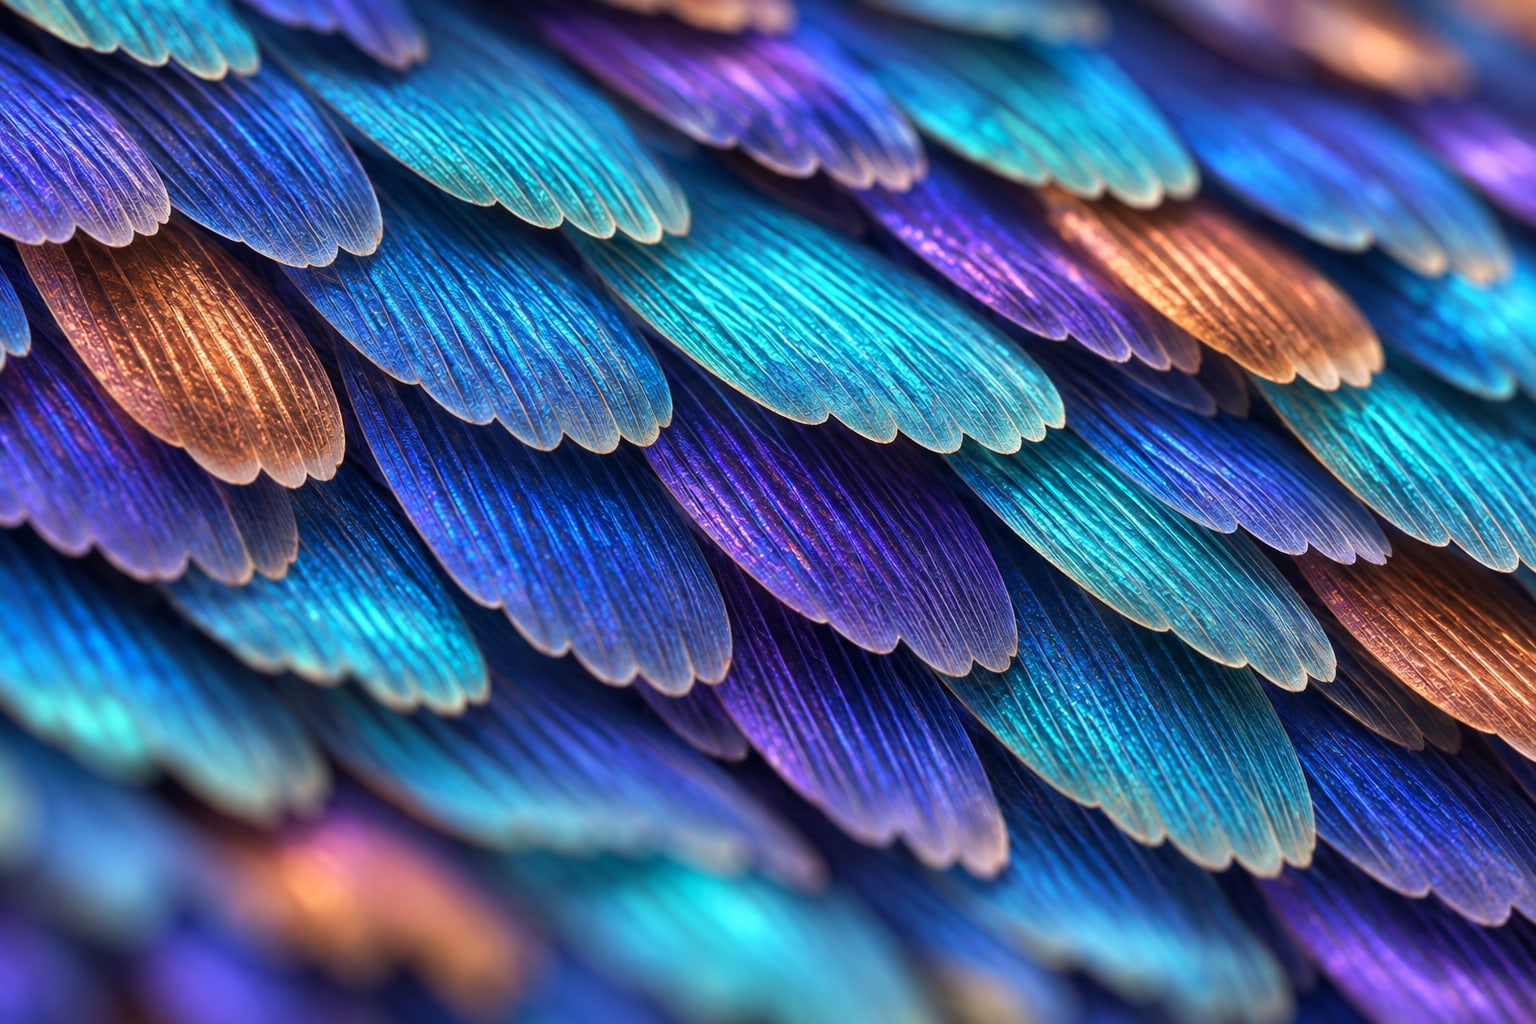
Prompt
Create a striking microscopy-inspired image of the tiny scales on an imaginary butterfly wing. Fill the entire landscape 3:2 frame with overlapping elongated scales arranged like delicate roof shingles. Each scale has fine parallel ridges, softly scalloped tips, and a subtly translucent edge. Use luminous turquoise, deep cobalt, and violet, with a few warm copper scales catching the light. View the surface at a low oblique angle so the layered texture feels three-dimensional. Render intricate believable surface detail, soft directional laboratory-style illumination, and shallow depth of field, with a sharply focused band across the middle and softer foreground and background. Make the small structures feel like a surprising hidden landscape. This is an artistic, imagined microscopic view, not a real microscope photograph or an identified species. Do not show a whole butterfly, eyes, insects, labels, text, magnification numbers, scale bars, logos, or borders.
Make it yours: Try the surface of a leaf, a salt crystal, or a woven fiber. Describe the texture and say whether the view is imagined or based on a reference.
Follow-up to try
Keep the scale shapes, arrangement, viewpoint, and framing unchanged. Make the depth of field wider so more of the ridged surfaces appear sharp. Keep the same colors and do not add labels.
12. Turn a product idea into a technical concept sheet.
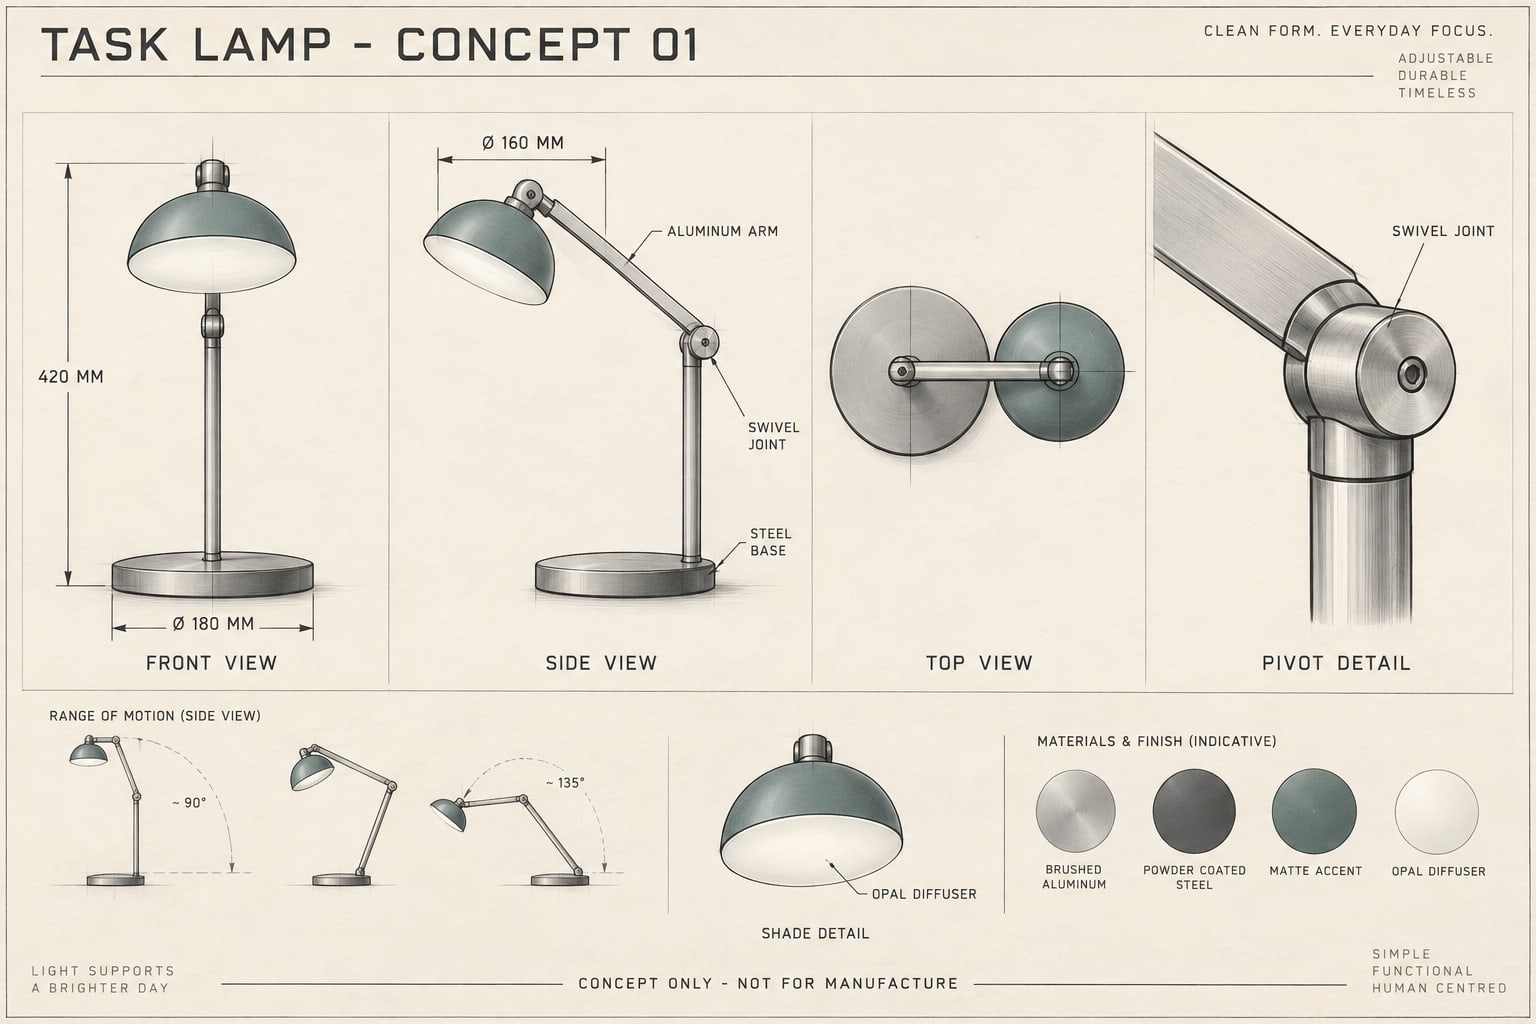
Prompt
Create a detailed industrial design concept sheet of an adjustable desk lamp in a landscape 3:2 composition. Use warm off-white drafting paper, fine dark graphite linework, subtle gray shading, and restrained teal accents. Arrange consistent front, side, and top views plus one enlarged pivot detail in a clean, spacious grid. Show the same lamp throughout: a circular steel base, slender metal stem, hinged angled aluminum arm, and a small rounded shade with an opal diffuser. Use crisp dimension lines and readable uppercase lettering. Title the sheet exactly "TASK LAMP - CONCEPT 01". Label the views "FRONT VIEW", "SIDE VIEW", "TOP VIEW", and "PIVOT DETAIL". Show "420 MM" for overall height, "Ø 180 MM" for base diameter, and "Ø 160 MM" for shade diameter. Add leader-line callouts reading "ALUMINUM ARM", "STEEL BASE", "SWIVEL JOINT", and "OPAL DIFFUSER". Put "CONCEPT ONLY - NOT FOR MANUFACTURE" along the bottom. Give the sheet a polished product-design presentation with balanced margins, clear visual hierarchy, and legible annotations. This is an illustrative concept, not a verified engineering drawing. Do not include electrical wiring, ratings, certification seals, logos, or watermarks.
Make it yours: Try a chair or a small speaker. Specify the views, materials, labels, and a few dimensions you want to include.
Follow-up to try
Keep the lamp design, dimensions, labels, and four-view layout unchanged. Make the teal accents subtler and increase the contrast of the dimension lines so they are easier to read.
Change one thing and compare the result.
The coastal café is a good place to practice editing. The first image has warm windows, blue evening light, and a wet street. The follow-up from example 1 asks for a clear golden sunrise while keeping the café, bicycle, ocean, and viewpoint in place.
This edit needs the first image. Send it in the same conversation where you made the café, or attach the café image before you ask for the change.
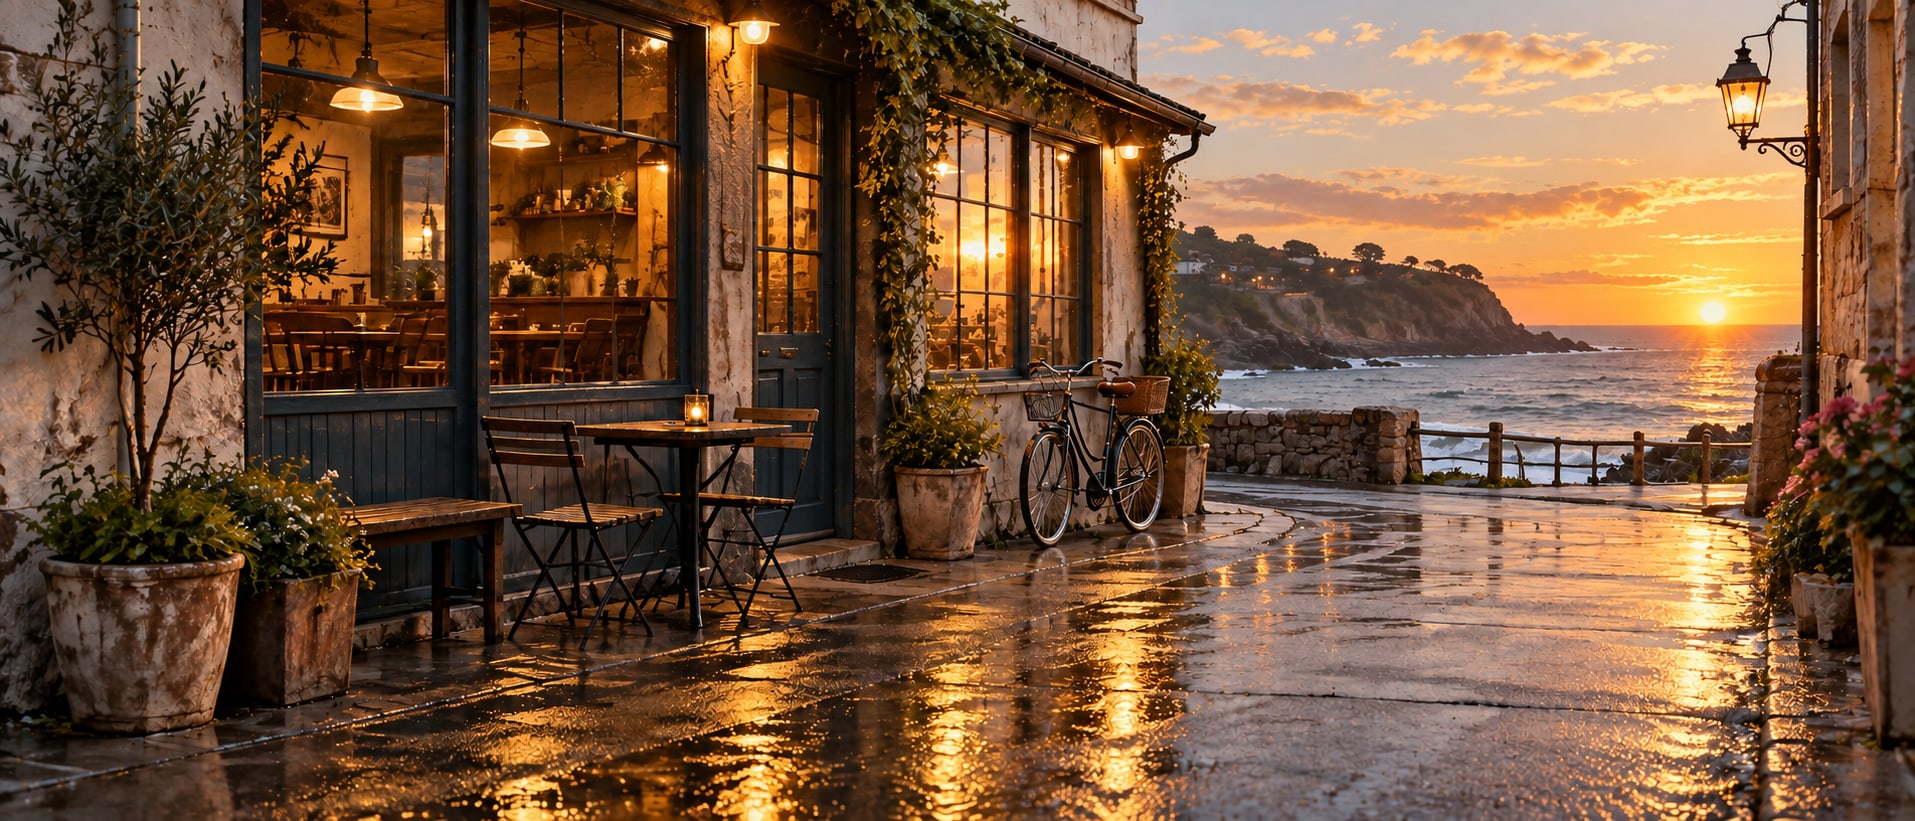
Compare the two. The questions that matter: did the change you asked for happen, and did the details you wanted to keep survive it? An edit request gives direction, and it's still worth checking the result closely.
For your own images, start with one adjustment: the light, a color, or one object. Changing all three at once makes it hard to tell which instruction helped.
Fix the part that isn't working.
If ChatGPT describes an image instead of making one: ask directly, “Create this image.” Check that image creation is available on your account. A style label on its own doesn't explain the task.
If the image feels generic: replace broad praise with details you could see. Name the material, time of day, viewpoint, or setting. “A handmade paper model under warm desk-lamp light” is more concrete than “an amazing miniature.”
If the text is wrong: shorten it and put the exact wording in quotation marks. Ask for no other writing. Read every word before you use the image, especially on packaging, posters, and infographics.
If an edit changes too much: name the things that must stay fixed, and try one change at a time. You can also select just the part you want changed with the selection tool. If a detail needs to be exact, check it rather than assuming the instruction preserved it.
If the crop is wrong: say whether you want a square, portrait, or landscape image, and ask for the whole subject to stay inside the frame. Check the final crop where the image will actually be used.
If you reach a usage limit: follow the availability information ChatGPT shows you. Repeating a prompt or adding a slash label doesn't get around it.
Keep the useful parts and try something new.
Try this
- Choose an ordinary subject near you: your shop, your street, or your coffee mug.
- Make it in three styles from this guide, for example as a miniature, a movie poster, and a comic.
- Keep the version that surprises you, then ask for one deliberate improvement.
If you're creating images for a business, add the audience, the intended use, and your brand details to the brief. The five-document AI business brief can help you gather that context.
Take the other 38 ideas with you.
The free PDF lists all 50 style labels with plain-English meanings. Twelve are demonstrated in this guide. The other 38 are starting points for your own experiments. No email address required.
Download all 50 image ideas · PDF, 111 KB Plain-text version · TXT, 6 KB
Use photos you have permission to upload, and check generated details before you publish anything. A convincing illustration can still contain an invented fact, an incorrect label, or a part that doesn't make physical sense.
You don't need to start with a complicated prompt. Start with an idea you can describe, look at what comes back, and make your next instruction a little more useful.


